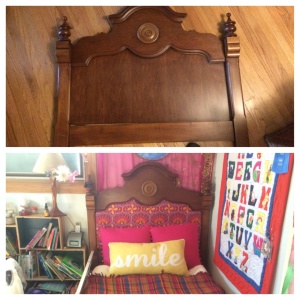
I’ve always wanted to try my hand at upholstery and my daughter’s headboard gave me a perfect chance because it doesn’t matter how the back looks (as I’ve said I’m a crafter, but a lazy crafter…I am content to “satisfice.”) It took me about 2-hours to do this project (with lots of resting in-between steps.) Someone more skilled or motivated than me could probably have completed it in 45-minutes.
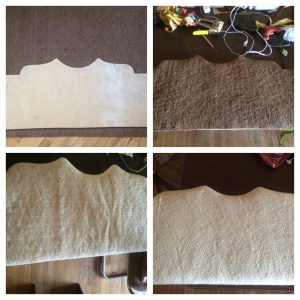
The biggest challenge I had with this project was finding a material to use in place of foam because I wanted to avoid the flame retardant chemicals present in traditional upholstering materials. But I found the perfect material: coir matting! You simply outline the shape you need, cut it out and glue gun it to the plywood. I used two layers of coir, one layer of wool batting, one of cotton and then the final fabric and it turned out BEAUTIFULLY! All of my batting and fabrics were organic. You can find materials like what I used here. The organic cotton decorative fabric I purchased from Honey Bee Good.
Steps:
1. Trace outline of shape on 1/4-inch plywood (preferably FSC-certified and no/low-VOC) and cut it out (my husband is a wiz on the bandsaw which was necessary for this intricate a shape.)
2. Trace shape on coir mat and cut out. Be sure to cut just INSIDE the line because you don’t want the coir to overhang the wood. Use a glue gun to secure it in place.
3. Trace the shape onto the wool batting leaving 2-3-inch overhang. Use a heavy duty staple gun to secure. Do the same with the cotton batting and then the final fabric.
4. Attach the upholstery: Some beds have an inset bevel that allows you to nest the upholstery into the bevel the way you next a photograph into a frame where about 1-inch of the photograph is covered. You then simply put a back on the upholstered part to screw it in place, again, much like the picture in a frame. Our bed did not have that inset bevel. We WERE able to remove the piece of decorative wood you see in the center, but since I wanted the upholstered piece to sit within the decorative grooves, we had to find a way to attach it to the back of the frame. So we used corner brackets turned at a 90-degree AWAY from the corner to secure the fabric headboard to the back (should have take a picture of this but I didn’t…darn…will try to do at a later date!) Basically if you think of the top-right corner of the bed imagine positioning the bracket like a capital letter “L” with one screw going through the back of the upholstered plywood and the other screw going through the headboard frame. ALL THE MATERIALS I USED (including the brackets/screws) can be found here.
There is nothing cozier to me than leaning up against an upholstered headboard with a good book! Enjoy!

